修改 websocket 插件以支持 socks5 代理或者指定 IP 接口
-
PYMUD支持使用socks5代理或者本机的特定网络接口进行网络访问,这本来是没问题的,但是对应北侠fullme的时候,原来提供的websocket插件会无法显示图片。使用浏览器打开时,会提示同一个IP为其他IP的角色显示过fullme图片,因此不能正确显示。此时,就需要让websocket插件通过与会话角色对应的代理或者网络设置来进行显示了。修改原 websocket.py 中的 loadAndSenfFullme 的函数代码,改为如下内容,可以使用与会话相同的网络配置来进行图片获取和下载,再使用websocket传送到web端页面上用于显示。只需要修改此处一个函数即可。
修改后的代码片段如下:
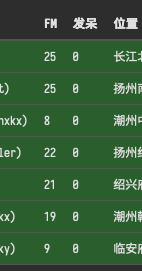
async def loadAndSendFullme(sender, text_msg: str, fullme_url: str, times: int = 3, combine: bool = False):
    fmadress = fullme_url.split("robot.php?filename=")[-1]
    url = f"http://fullme.pkuxkx.net/robot.php?filename={fmadress}"
    images = []

    # 使用与会话相同的网络配置进行图片抓取
    conn = None
    pymudapp = app.pymud
    if isinstance(pymudapp, PyMudApp):
        session = pymudapp.sessions.get(sender)

        if isinstance(session, Session):
            if session.proxy:
                conn = ProxyConnector.from_url(session.proxy)
            elif session.local_address:
                conn = TCPConnector(local_addr=(session.local_address, 0))

    async with ClientSession(connector=conn) as client:
        for i in range(0, times):
            async with client.get(url) as response:
                if response.status != 200:
                    continue

                text = await response.text()
                matches = re.search(r'src="\.([^"]+\.jpg)"', text)
                if not matches:
                    continue

                img_url = "http://fullme.pkuxkx.net" + matches.group(1)

                # 解析URL获取文件名
                parsed_url = urlparse(img_url)
                filename = os.path.basename(unquote(parsed_url.path))
                # 创建fullme目录
                fullme_dir = os.path.join(os.path.dirname(__file__), 'fullme')#cl
                os.makedirs(fullme_dir, exist_ok=True)
                # 本地文件路径
                local_img_path = os.path.join(fullme_dir, filename)
                # 下载图片
                #async with ClientSession(connector=conn) as session:
                async with client.get(img_url) as img_response:
                    if img_response.status == 200:
                        with open(local_img_path, 'wb') as f:
                            f.write(await img_response.read())
                        # 使用本地路径调用
                        if not combine:
                            await send_message_to_clients(sender, text_msg, local_img_path)
                        else:
                            images.append(local_img_path)
                    else:
                        asyncio.create_task(send_message_to_clients(sender, f"{text_msg} (图片下载失败: HTTP {img_response.status})", ""))

            await asyncio.sleep(0.5)

    if combine:
        await send_message_to_clients(sender, text_msg, images)
以下是我使用本地IP连接了5个账号,同时使用代理后,利用远端云服务器连接了2个账号时,websocket插件的显示部分。
-
要像上图一样同时监控多个账号的状态,参考以下方法:
- 使用本帖附带的 websocket 插件
- 在某一个角色都加载的脚本中,构建一个 overview 函数,并通过调用插件的 sendOverview 方法注册到插件中。示例如下:
from pymud import IConfig

class AExampleOfOverview(IConfig):
    def __init__(self, session, *args, **kwargs):
        ws = self.session.getGlobal("ws")
        if ws and hasattr(ws, "sendOverview"):
            ws.sendOverview(self.session, self.overview)

    # 此函数为关键,返回一个dict,key会作为websocket显示状态的表头,内容在下面
    def overview(self):
        data = dict()
        data["角色"] = (
            f"{self.session.getVariable('name', 'none')}({self.session.getVariable('id', 'id')})"
        )

        # fullme time
        fullme = int(self.session.getVariable("%fullme", 0))
        delta = time.time() - fullme
        data["FM"] = int(delta // 60)
        data["发呆"] = int(self.session.idletime // 60)

        data["位置"] = (
            f"{self.session.getVariable('city', '未知地域')}{self.session.getVariable('room', '未知房间')}"
        )

        data["任务"] = self.session.cmds["jobmanager"].currentJob
        data["状态"] = self.session.cmds["jobmanager"].currentStatus
        data["忙闲"] = "忙" if self.session.getVariable("is_busy", False) else "闲"
        data["战斗"] = self.session.getVariable("is_fighting", False)

        return data
以下是插件最新版本