tmux.conf配置设置缓存上限?
Global Moderators
私有
Forum wide moderators
帖子
-
云服务器上内存缓慢增长,有哪些调试手段? -
关于如何调试pymud脚本的配置对PyMUD的脚本调试设置其实很简单,以下是以vscode为例的设置步骤。
按下图,先将1处,python脚本环境设置为你的venv所在的环境,uv的、venv直接创建的、或者原始的环境都可以,目的是让调试环境找得到python运行程序以及pymud包文件。然后单击2处,切换到调试界面,从3处点击下拉框,见第二张图。

单击上图3处的下拉框。
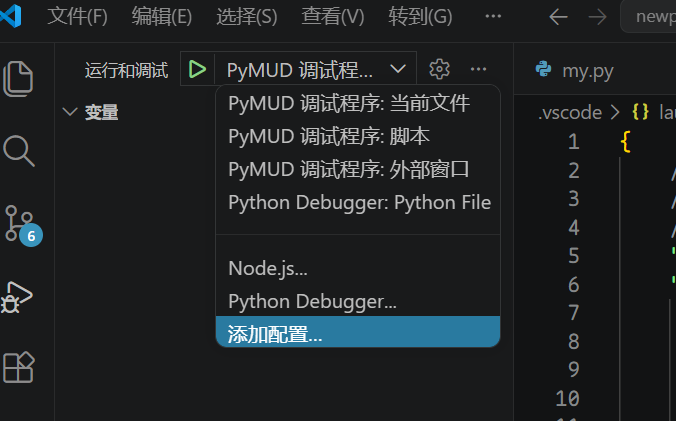
从这里选择添加配置,自动切换到json编辑配置环境,将新增的配置内容修改为如下即可:{ "name": "PyMUD 调试程序: 脚本", "type": "debugpy", "request": "launch", "module": "pymud", "justMyCode": false, "console": "integratedTerminal", },关键点1:要将原来调试配置中的 “program: ${file}” 这一行删掉,修改为: "module": "pymud"
关键点2: 将 "justMyCode" 设置为 false,可以在pymud包中的代码出打断点和监控
关键点3: console默认为 integratedTerminal,是vscode自己集成的终端中运行,这个也可以修改为externalTerminal,即使用外部终端上述设置好之后,给这个调试配置去一个名字,比如我上面就叫 "PyMUD 调试程序: 脚本"。
然后,重新从图1中3处下拉框选择该调试配置,即可对脚本(以及pymud模块)进行正常调试了。 -
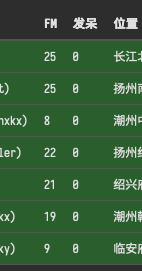
修改 websocket 插件以支持 socks5 代理或者指定 IP 接口要像上图一样同时监控多个账号的状态,参考以下方法:
- 使用本帖附带的 websocket 插件
- 在某一个角色都加载的脚本中,构建一个 overview 函数,并通过调用插件的 sendOverview 方法注册到插件中。示例如下:
from pymud import IConfig

class AExampleOfOverview(IConfig):
    def __init__(self, session, *args, **kwargs):
        ws = self.session.getGlobal("ws")
        if ws and hasattr(ws, "sendOverview"):
            ws.sendOverview(self.session, self.overview)

    # 此函数为关键,返回一个dict,key会作为websocket显示状态的表头,内容在下面
    def overview(self):
        data = dict()
        data["角色"] = (
            f"{self.session.getVariable('name', 'none')}({self.session.getVariable('id', 'id')})"
        )

        # fullme time
        fullme = int(self.session.getVariable("%fullme", 0))
        delta = time.time() - fullme
        data["FM"] = int(delta // 60)
        data["发呆"] = int(self.session.idletime // 60)

        data["位置"] = (
            f"{self.session.getVariable('city', '未知地域')}{self.session.getVariable('room', '未知房间')}"
        )

        data["任务"] = self.session.cmds["jobmanager"].currentJob
        data["状态"] = self.session.cmds["jobmanager"].currentStatus
        data["忙闲"] = "忙" if self.session.getVariable("is_busy", False) else "闲"
        data["战斗"] = self.session.getVariable("is_fighting", False)

        return data
以下是插件最新版本
-
北大侠客行,线索名称与房间名对应关系校正欢迎补充
def get_search_place(self, city, room): station = ["大车行", "车马商行", "马车行", "车马行", "大车店", "车行", "马车店"] if city == "扬州": if room == "鹿鼎公长大的地方": room = "丽春院" elif room == "衙门里面北院": room = "内宅" elif city == "衢州": if room == "小酒铺": room = "酒铺" elif room == "大米店": room = "米铺" elif room == "大南门": room = "礼贤门" elif room == "大西门": room = "航运门" elif room == "铁衢门": room = "迎和门" elif room == "府衙正厅": room = "大堂" elif room == "余五婆的家": room = "民居" elif room == "北门": room = "永清门" elif city == "潮州": if room == "邢捕头常在的地方": room = "中央广场" elif room == "青楼": room = "翠红阁" elif room in station: room = "潮州车行" elif city == "代州": if room in station: room = "靖边大车店" elif city == "中原": if room in station: room = "中原马车总行" elif city == "南阳": if room in station: room = "南阳车行" elif city == "上饶": if room == "镖局": room = "龙虎镖局" elif room == "塔山": room = "武安山" elif room in ("试剑处", "葛玄试剑处"): room = "试剑石" elif room == "广场": room = "中央广场" elif room == "酒铺": room = "酒馆" elif city == "绍兴府": if room in station: room = "绍兴马车行" elif room == "府衙": room = "绍兴府衙" elif room == "双龙洞内": room = "洞内" elif room in ("铁匠铺子", "打铁铺"): room = "铁匠铺" elif room == "西施浣纱处": room = "浣纱溪边" elif room == "金华火腿店": room = "火腿店" elif room == "游龙帮总坛": room = "游龙帮" elif city == "武当山": if room in station: room = "中原马车行" elif room == "张三丰闭关处": room = "小屋" elif city == "临安府": if room in station: room = "计氏马车分行" elif room == "青楼": room = "怡红馆" elif room == "府级官员办公处": room = "临安府大堂" elif room in ("韩世忠府大门", "韩世忠府邸门口"): room = "韩王府大门" elif city == "湖州": if room in station: room = "车马行" elif city == "大同": if room in station: room = "大同车行" elif city == "建康府南城": if room == "官府所在": room = "建康府" elif room == "青楼": room = "绛云楼" elif room in ("宠物商店", "宠物商铺"): room = "建康府南城宠物店" elif city == "威海卫": if room in station: room = "计氏马车分行" elif city == "建康府北城": if room in station: room = "计氏马车分行" elif city == "镇江": if room in station: room = "计氏马车分行" elif city == "嘉兴": if room in station: room = "计氏马车分行" elif city == "处州府": if room == "官府所在": room = "大厅" elif room in station: room = "马车行" elif city == "天台山": if room == "官府所在": room = "大堂" elif city == "台州": if room == "官府所在": room = "府衙大堂" elif city == "建宁府": if room in station: room = "建宁马车行" elif room == "官府所在": room = "府衙" elif city == "归云庄": if room in station: room = "计氏马车分行" elif city == "苏州": if room in station: room = "计氏马车分行" elif city == "无锡": if room in station: room = "无锡车马行" elif city == "南昌": if room in station: room = "计氏马车总行" return "{}{}".format(city, room) -
修改 websocket 插件以支持 socks5 代理或者指定 IP 接口PYMUD支持使用socks5代理或者本机的特定网络接口进行网络访问,这本来是没问题的,但是对应北侠fullme的时候,原来提供的websocket插件会无法显示图片。使用浏览器打开时,会提示同一个IP为其他IP的角色显示过fullme图片,因此不能正确显示。此时,就需要让websocket插件通过与会话角色对应的代理或者网络设置来进行显示了。修改原 websocket.py 中的 loadAndSenfFullme 的函数代码,改为如下内容,可以使用与会话相同的网络配置来进行图片获取和下载,再使用websocket传送到web端页面上用于显示。只需要修改此处一个函数即可。
修改后的代码片段如下:
async def loadAndSendFullme(sender, text_msg: str, fullme_url: str, times: int = 3, combine: bool = False):
    fmadress = fullme_url.split("robot.php?filename=")[-1]
    url = f"http://fullme.pkuxkx.net/robot.php?filename={fmadress}"
    images = []

    # 使用与会话相同的网络配置进行图片抓取
    conn = None
    pymudapp = app.pymud
    if isinstance(pymudapp, PyMudApp):
        session = pymudapp.sessions.get(sender)

        if isinstance(session, Session):
            if session.proxy:
                conn = ProxyConnector.from_url(session.proxy)
            elif session.local_address:
                conn = TCPConnector(local_addr=(session.local_address, 0))

    async with ClientSession(connector=conn) as client:
        for i in range(0, times):
            async with client.get(url) as response:
                if response.status != 200:
                    continue

                text = await response.text()
                matches = re.search(r'src="\.([^"]+\.jpg)"', text)
                if not matches:
                    continue

                img_url = "http://fullme.pkuxkx.net" + matches.group(1)

                # 解析URL获取文件名
                parsed_url = urlparse(img_url)
                filename = os.path.basename(unquote(parsed_url.path))
                # 创建fullme目录
                fullme_dir = os.path.join(os.path.dirname(__file__), 'fullme')#cl
                os.makedirs(fullme_dir, exist_ok=True)
                # 本地文件路径
                local_img_path = os.path.join(fullme_dir, filename)
                # 下载图片
                #async with ClientSession(connector=conn) as session:
                async with client.get(img_url) as img_response:
                    if img_response.status == 200:
                        with open(local_img_path, 'wb') as f:
                            f.write(await img_response.read())
                        # 使用本地路径调用
                        if not combine:
                            await send_message_to_clients(sender, text_msg, local_img_path)
                        else:
                            images.append(local_img_path)
                    else:
                        asyncio.create_task(send_message_to_clients(sender, f"{text_msg} (图片下载失败: HTTP {img_response.status})", ""))

            await asyncio.sleep(0.5)

    if combine:
        await send_message_to_clients(sender, text_msg, images)
以下是我使用本地IP连接了5个账号,同时使用代理后,利用远端云服务器连接了2个账号时,websocket插件的显示部分。
-
PyMUD 更新 0.22.5 版0.22.5 (2026-05-02)
- 功能新增: 为Session类型增加 invalidate 方法,调用该方法时,只有本会话是当前会话时,该方法才会调用 PyMudApp.invalidate() 进行刷新。
- 注意事项: 对于在个人脚本中调用的 session.application.invalidate() 方法,建议改成 session.invalidate()。因为会话的刷新会判断前台,而application的刷新会强制刷新。
- 功能新增: 增加 lazy 模式,当设置为 lazymode 模式时,即使 PyMudApp.invalidate() 的调用也不会进行显示刷新,系统仅保留在切换会话、以及定时1s材记性刷新。该模式可以通过快捷键F4切换。在lazy模式下,最底下状态栏右侧会显示"LAZY"提示。该模式可以用于在后台挂机运行时,降低CPU占用率。
- 功能新增: 增加 verbatim 模式,当设置为 verbatim 模式时,所有命令行输入的命令,都不会进行解析,直接发送到服务器。该模式可以通过快捷键F3切换。在 verbatim 模式下,最底下状态栏右侧会显示"VERB"提示。
- 功能新增: 增加一个非解析提示符"/",当在命令行行首使用该提示符时,所有后续命令不进行任何解析,直接发送到服务器。该提示符可以通过 pymud.cfg 中的 noparser 进行覆盖。此提示符相当于临时使用 verbatim 模式。
- 功能新增: 增加设置 "cmd_prefix",当配置该参数后,在窗口中的命令回显或者log记录中,输入的命令会带有该前缀。改配置默认为空白,可以通过 pymud.cfg 中的 cmd_prefix 进行覆盖。同步调整了命令的显示样式,与info默认值相同。
- 功能调整:在#var等命令执行之后,会调用del删除创建的临时列表,以加快内存释放。
- 功能调整: 在会话被关闭时,会调用del对会话中的相关对象同步进行清除,并使用代码调用执行垃圾回收(但我测试了,并没有啥用处,内存占没什么变化)。
- 问题修复: 修复了在使用网络配置(包括指定IP和使用socks5代理)连接服务器后,当断开后,再重新执行 #con 不会再次调用网络配置,而是直接使用默认配置的问题。
English update history is translated by TRAE (GLM5)
0.22.5 (2026-05-02)
- New Feature: Added
invalidatemethod to Session class. When called, it only triggersPyMudApp.invalidate()for refresh if the current session is the active session. - Note: For
session.application.invalidate()calls in personal scripts, it is recommended to change tosession.invalidate(). Because session refresh checks for foreground status, while application refresh forces a refresh. - New Feature: Added lazy mode. When lazy mode is enabled, even
PyMudApp.invalidate()calls will not trigger display refresh. The system only refreshes when switching sessions or on a 1-second timer. This mode can be toggled with the F4 hotkey. In lazy mode, "LAZY" is displayed on the right side of the bottom status bar. This mode can be used to reduce CPU usage when running in the background. - New Feature: Added verbatim mode. When verbatim mode is enabled, all commands entered in the command line are sent directly to the server without any parsing. This mode can be toggled with the F3 hotkey. In verbatim mode, "VERB" is displayed on the right side of the bottom status bar.
- New Feature: Added a non-parsing prefix "/". When this prefix is used at the beginning of a command line, all subsequent commands are sent directly to the server without any parsing. This prefix can be overridden via
noparserin pymud.cfg. This prefix is equivalent to temporarily using verbatim mode. - New Feature: Added "cmd_prefix" setting. When configured, command echo in the window or log records will display commands with this prefix. Default is empty, can be overridden via
cmd_prefixin pymud.cfg. Also adjusted command display style to match the default info style. - Improvement: After executing commands like #var, temporary lists created are deleted using
delto speed up memory release. - Improvement: When a session is closed, related objects in the session are cleared synchronously using
del, and garbage collection is triggered programmatically (however, testing showed no significant effect on memory usage). - Bug Fix: Fixed the issue where after disconnecting, when you using #con, the default network configuration is used instead of the one you specified.
-
PyMUD 0.22.4 正式版发布0.22.4 (2026-02-24)
- 功能新增: 当一台设备拥有多个网卡和IP时,可以指定使用哪个IP进行连接。
- 功能新增: 支持直接使用socks5代理进行连接。可以支持无需认证的代理(如ssh -D创建的socks5代理),和用户名密码认证的代理。
- 功能新增: 上述两功能,通过新增的 network 配置字典来实现,也可以在#session, #connect命令中直接指定。使用方式见下方。
- 问题修复: 修复了提示错误代码时不正确显示函数名、文件名和行数的情况
- 问题修复: 修复了内存监控启动代码BUG导致无法正常监控的问题
- 其他变更: 完善修复了所有涉及 basedpyright 提示不符合编码标准的内容,改为更符合编码标准的写法
- 其他变更: 默认的 remain_last_input 现在设置为 True 了
- 其他变更: 新版的 SessionBuffer 确认可以正常运行,删除了原来的 SessionBuffer 实现
- 其他变更: 移除了所有不需要的 import 内容
- 其他变更: 当所有会话都被关闭后,底下的状态窗口将会清空
多IP网络/Socks5代理连接使用方法:
-
首先在pymud.cfg中增加配置字段 network,内容如下(如果复制使用,请删除注释内容):
{ // 放在根节点内部即可 "network" : { "ipv6": false, // 是否启用ipv6,可接受 true|false,默认为false。该设置仅会影响 auto 模式模式,即设置 auto 模式是否会自动获取IPv6地址 "local_addr": "auto", // 本地绑定的IP地址,可接受 auto|preset,默认auto,即自动获取本地所有网络设备的IP,当配置为 preset 时,会使用ip_list中的IP "ip_list": [ // 当local_addr设置为 preset 时,需要配置该字段,用于指定使用哪个IP进行连接。 "192.168.1.100", "192.168.2.100", ], "proxy": true, // 是否启用代理,可接受 true|false,默认为false。 "proxies": { // Socks5代理列表,可配置多个,即可以使用无密码的代理,也可以使用用户名密码认证的代理。 "proxy1": "socks5://192.168.6.66:1080", // 使用proxy1标识该无密码代理 "proxy2": "socks5://user:password@yoursock5proxy.site:1080", // 使用proxy2标识该用户名密码认证代理 } } } -
当配置完成后,启动pymud时, 世界菜单中,每一个角色的都会添加一个下级菜单,将IP和代理列表中的代理都添加为子菜单。此时,角色自身菜单,以及下级子菜单都可以单机连接到服务器。
-
当依然单机角色菜单时,会使用系统当前默认网络设备进行连接。
-
当点击角色下级菜单中的IP时,会指定绑定该IP进行连接。例如,一台设备有2个网卡,一个连接到电信网络,一个连接到联通网络,即使系统设置默认连接是网卡1电信网络,通过IP绑定也可以使用联通网络连接到服务器。
-
当点击角色下级菜单中的代理时,会指定使用该代理进行连接。例如,在配置中增加了一个代理 proxy1,当点击角色下级菜单中的 proxy1 时,会使用该代理进行连接。
-
也可以在#session/#connect命令中指定IP或代理。二者语法相同,都是在最后面增加了 >> 来指定IP或代理。注意,>>之后的IP或者代理之间没有空格。例如:
- #session pkuxkx.newstart >>#2 # 指定使用ip_list中(当local_addr设置为 preset 时)或自动获取的ip列表(也会显示在菜单上)的第2个(序号从1开始)IP进行连接
- #session pkuxkx.newstart >>@proxy1 @ 指定使用proxies中配置的proxy1代理进行连接
- #con >>>#1 # 会话断开后(比如使用#dis命令),可以使用 #con 重新指定以第1个IP连接。
- #con >>socks5://192.168.6.67:1080 # 也可以在命令直接指定新的socks5代理。(IP只能使用序号指定,不接收手动填入)
-
#con命令也可以使用三个大于号 >>> 来连接。这二者区别在于,当使用 >> 时,该配置会变成本会话的默认配置,下次直接 #con 就是使用该配置;而使用 >>> 时,只是临时指定该配置,下次 #con 还是会使用原先的配置。
-
PyMUD 0.22.2 正式版发布@terry 贴出来你的pymud.cfg中的session配置和auto_chars配置内容看看,注意隐去你的具体id和pass。
-
初探pymud的自动地图功能图片有点模糊,看不清楚